
Introduction
Microsoft Teams is a unified
communication and collaboration platform that combines workplace chat, Video
conferencing, meetings and many other application integrations that are in line
with Microsoft 365 Apps subscription office productivity suite. Teams is new,
but it’s everywhere already!
Microsoft Teams is the evolution
and upgraded version of the Microsoft Skype for Business.
Nevertheless, when it comes to Multi-user
environments such as Citrix APP/Desktop or WVD Teams that are not the easiest
to install teams on since teams will be installed in the user profile and its
quite a big installation. A clean installation will be around 600MB and it is
bound to increase which, in turn, will have an impact on the logon duration.
Installation of Teams
To Install and function Teams on Multi-user
environments, a machine-based installation must be used. When using the
machine-based installation, Teams data will be in the following folder
locations.
64 Bit
- C:\Program Files (x86)\Teams Installer
32 Bit
- C:\Program Files\Teams Installer
Note that automatic update should be disabled
with the use of this method and this method is recommended for Multi-user
environments only
Step 1
Download the MSI package. Click here
Step 2
You must uninstall the current version prior to the installation or update.

msiexec /i [Path_to_MSI] /l*v [Path to install_logfile_name] ALLUSER=1 ALLUSERS=1


By default, HDX optimization for Teams is enabled in the VDA and if you are using a supported Workspace app, the following registry key will be configured to 1 automatically.
You must uninstall the current version prior to the installation or update.
Method 01: Uninstall using a PowerShell script. Click Here
Method 02:
Start CMD as an Administrator and start the uninstallation with the following command:
msiexec
/passive /x [Path to MSI] /l*v [Path to uninstall_logfile]
Step 3
Start CMD as an Administrator and start the installation with the following command:msiexec /i [Path_to_MSI] /l*v [Path to install_logfile_name] ALLUSER=1 ALLUSERS=1
Prior to the installation on WVD,
add the following registry key
[HKEY_LOCAL_MACHINE\SOFTWARE\Microsoft\Teams\IsWVDEnvironment]
Type: REG_DWORD
Value: 1
Note: This will install Teams to Program
Files (x86) on 64-bit systems and Program Files folder on 32-bit systems.
-------------------------------------------------------------------------------------------------------------------------------------
Important (Citrix App Layering):
If you are using Citrix App Layering
PortICA key needs to add to the following registry path before you start the Teams
installation with ALLUSER=1
HKEY_LOCAL_MACHINE\SOFTWARE\Citrix
Or
HKEY_LOCAL_MACHINE\SOFTWARE\WOW6432Node\Citrix
------------------------------------------------------------------------------------------------------------------------------------
Changes to be made on user profile solutions
Remove the following path if you
have excluded in your user profile solution.
- Roaming/Microsoft/Teams
- %AppData%\Microsoft\Teams\Application Cache
- %AppData%\Microsoft\Teams\Cache
- %AppData%\Microsoft Teams\Logs
- %AppData%\Microsoft\Teams\media-stack
- %Localappdata%\SquirrelTemp
- %Localappdata%\Microsoft\Teams\Current\Locales
- %Localappdata%\Microsoft\Teams\current\resources\locales
- %Localappdata%\Microsoft\Teams\Packages\SquirrelTemp
- %AppData%\/Microsoft/Teams/*.txt
Add the following files paths to
the files to synchronize. In my case in only require EN. Add more locales which are suites for your environment.
- %Localappdata%\Microsoft\Teams\Current\Locales\en*.pak
- %Localappdata%\Microsoft\Teams\current\resources\locales\locale-en*
------------------------------------------------------------------------------------------------------------------------------------
Recommendations
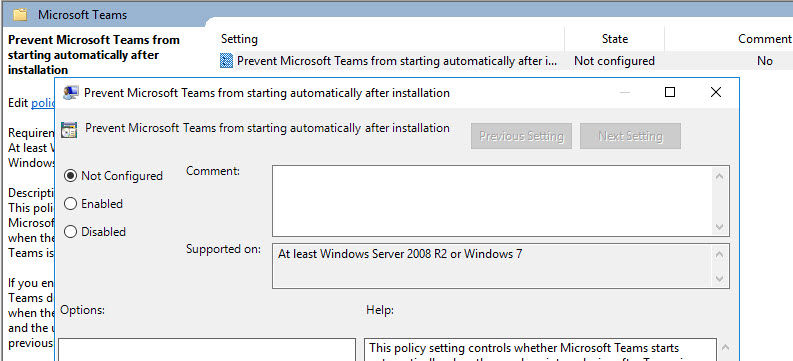
Disabling Teams AutoStart
- Enable to prevent Microsoft Teams from starting automatically after installation policy under User Configuration\Policies\Administrative Templates\Microsoft Teams
Note: If you are unable to find the policy, you may be missing the latest
ADMX files in your policy central store. Download the latest ADMX files for Office365
and copy them into the Policy definition folder under SYSVOL.
------------------------------------------------------------------------------------------------------------------------------------
Microsoft Teams redirection (Citrix)
Enable Microsoft Teams redirection policy on Citrix Studio
Note that, in order to get this configured on your environment the following requirements should be met.
- Controller Version: Minimum version - Delivery Controller (DDCs) 1906.2
- VDA Version: Minimum version - Virtual Delivery Agents (VDAs) 1906.2
- Workspace App Version: Minimum version - Citrix Workspace app 1907 for Windows
- Support Server OSs: Windows Server 2019, 2016, and 2012 R2 (Standard and Datacenter Editions)
- Support Client OSs: Windows 10 64-bit, minimum versions 1607 up to 1909
By default, HDX optimization for Teams is enabled in the VDA and if you are using a supported Workspace app, the following registry key will be configured to 1 automatically.
When it comes to optimizing Teams, we need to consider some other
requirements as well. Please refer the following articles for more information.
I hope this helps! Please feel free to let me know if anything else needs to be added. Your suggestions and recommendation are welcome.
Thank You!


