Configuring Teams on your MULTI-USER ENVIRONMENT (Machine Based) - Citrix and WVD


Introduction

      Microsoft Teams is a unified communication and collaboration platform that combines workplace chat, Video conferencing, meetings and many other application integrations that are in line with Microsoft 365 Apps subscription office productivity suite. Teams is new, but it’s everywhere already!

Microsoft Teams is the evolution and upgraded version of the Microsoft Skype for Business.

     Nevertheless, when it comes to Multi-user environments such as Citrix APP/Desktop or WVD Teams that are not the easiest to install teams on since teams will be installed in the user profile and its quite a big installation. A clean installation will be around 600MB and it is bound to increase which, in turn, will have an impact on the logon duration.

Installation of Teams

To Install and function Teams on Multi-user environments, a machine-based installation must be used. When using the machine-based installation, Teams data will be in the following folder locations.

64 Bit - C:\Program Files (x86)\Teams Installer
32 Bit - C:\Program Files\Teams Installer

Note that automatic update should be disabled with the use of this method and this method is recommended for Multi-user environments only

Step 1

Download the MSI package. Click here

Step 2
You must uninstall the current version prior to the installation or update.

Method 01: Uninstall using a PowerShell script. Click Here

Method 02: 

Start CMD as an Administrator and start the uninstallation with the following command:

msiexec /passive /x [Path to MSI] /l*v [Path to uninstall_logfile]

Step 3

Start CMD as an Administrator and start the installation with the following command:
msiexec /i [Path_to_MSI] /l*v [Path to install_logfile_name] ALLUSER=1 ALLUSERS=1

Prior to the installation on WVD, add the following registry key

[HKEY_LOCAL_MACHINE\SOFTWARE\Microsoft\Teams\IsWVDEnvironment]
 Type: REG_DWORD
 Value: 1

Note: This will install Teams to Program Files (x86) on 64-bit systems and Program Files folder on 32-bit systems.

-------------------------------------------------------------------------------------------------------------------------------------

Important (Citrix App Layering):

If you are using Citrix App Layering PortICA key needs to add to the following registry path before you start the Teams installation with ALLUSER=1

HKEY_LOCAL_MACHINE\SOFTWARE\Citrix
Or
HKEY_LOCAL_MACHINE\SOFTWARE\WOW6432Node\Citrix

------------------------------------------------------------------------------------------------------------------------------------

Changes to be made on user profile solutions

Remove the following path if you have excluded in your user profile solution.
  • Roaming/Microsoft/Teams
Add the following folder paths to the exclude list- directories.
  • %AppData%\Microsoft\Teams\Application Cache
  • %AppData%\Microsoft\Teams\Cache
  • %AppData%\Microsoft Teams\Logs
  • %AppData%\Microsoft\Teams\media-stack
  • %Localappdata%\SquirrelTemp
  • %Localappdata%\Microsoft\Teams\Current\Locales
  • %Localappdata%\Microsoft\Teams\current\resources\locales
  • %Localappdata%\Microsoft\Teams\Packages\SquirrelTemp
Add the following file paths to the exclusion list - files
  • %AppData%\/Microsoft/Teams/*.txt
Add the following files paths to the files to synchronize. In my case in only require EN. Add more locales which are suites for your environment.
  • %Localappdata%\Microsoft\Teams\Current\Locales\en*.pak
  • %Localappdata%\Microsoft\Teams\current\resources\locales\locale-en*

------------------------------------------------------------------------------------------------------------------------------------

Recommendations


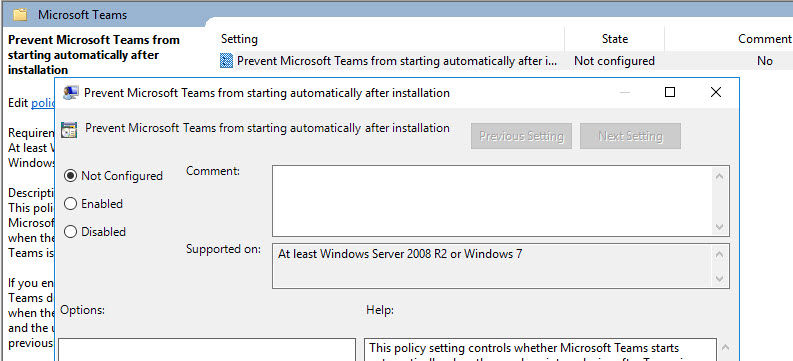
Disabling Teams AutoStart
  • Enable to prevent Microsoft Teams from starting automatically after installation policy under User Configuration\Policies\Administrative Templates\Microsoft Teams


Note: If you are unable to find the policy, you may be missing the latest ADMX files in your policy central store. Download the latest ADMX files for Office365 and copy them into the Policy definition folder under SYSVOL. 

------------------------------------------------------------------------------------------------------------------------------------

Microsoft Teams redirection (Citrix)

Enable Microsoft Teams redirection policy on Citrix Studio


Note that, in order to get this configured on your environment the following requirements should be met.

  • Controller Version: Minimum version - Delivery Controller (DDCs) 1906.2
  • VDA Version: Minimum version - Virtual Delivery Agents (VDAs) 1906.2
  • Workspace App Version: Minimum version - Citrix Workspace app 1907 for Windows
  • Support Server OSs: Windows Server 2019, 2016, and 2012 R2 (Standard and Datacenter Editions)
  • Support Client OSs: Windows 10 64-bit, minimum versions 1607 up to 1909


By default, HDX optimization for Teams is enabled in the VDA and if you are using a supported Workspace app, the following registry key will be configured to 1 automatically.

When it comes to optimizing Teams, we need to consider some other requirements as well. Please refer the following articles for more information.
I hope this helps! Please feel free to let me know if anything else needs to be added. Your suggestions and recommendation are welcome.

Thank You!

Load Balancing TFTP with Netscaler 11.1

In order to load balance TFTP via NetScaler you need to create the following:
  • Monitors
  • Servers
  • Services or a Service Group (I prefer a Service Group)
  • vServer (Virtual Server).
      In Provisioning Service configuration, option 66/67 is configured in DHCP in order to send the Boot Server Host Name and Boot File Name. Therefore, in this case, you need to configure option 66 with the VIP of the Load Balanced vServer.
      With the help of the NetScaler, we will create a vServer so that all the PVS Clients will be contacted to retrieve the boot information.

Monitor

  • Expand Traffic Management > Load Balancing > Monitors.

  • On the right, Click Add.

  • Name the Monitor (as preferred). 
  • Change the Type from the drop down to User.

  • Go to Special Parameters tab.
  • Change the Type from the drop down to nstftp.pl.
  • Click Create.


Servers

  • Expand Traffic Management > Load Balancing > Servers.


  • On the right Click Add.
  • Enter the Server Name.
  • Enter the IP address of the server.
  • Enter the comments as you wish to describe the server. (not a must)
  • Click Create.
  • Add the other Server.

Service Group

  • Expand Traffic Management > Load Balancing > Service Groups.
  • On the right, click Add.
  • Give the Service Group a striking name.
  • Change the Protocol to TFTP.
  • Click on “No Service Group Member” to add the Server objects.
  • Change the selection to Server Based and then select the server objects. If you did not create the server object before, then enter the IP address of a PVS Server.
  • Enter 69 the port.
  • Click Create.
  • Under Advanced Settings, Click Monitors.
  • Click on No Service Group to Monitor Binding under Monitors section.
  • Click on the arrow next to Click to select to select the Monitor.

  • Select Monitor_PVS and Click Select.

  • Then Click Bind.
  • To verify if the Monitor is working Click on Server Group Members.
  • Select a member server and then Click Monitor Details.
  • The Last Response Should be Success – Probe Succeeded. Click Close twice.
  • Click Done.

Load Balancing Virtual Server.

  • Expand Traffic Management > Load Balancing > Virtual Servers.

  • On the right, click Add.
  • Name the vServer as you wish.
  • Change the protocol to TFTP.
  • Enter a new internal VIP.
  • Enter 69 as the port.
  • Click OK.
  • Click on No Load Balancing Virtual Server ServiceGroup Binding under Services and Service Groups to add the Service Group or Service.
  • Click on the arrow next to Click to select to select the ServiceGroup.
  • Select the SVC_PVS Service Group and Click Select.
  • Click Bind.
  • Click Continue.
  • Under Advanced Settings click on Method.
  • Under Load Balancing Method Select ROUNDROBIN and Backup LB Method should be LEASTCONNECTION. Click OK.
  • Verify if LB vServer appears in the up state.

DNS/DHCP


Optional


  • Add a New A Host Record in the DNS. In this case, im using PVS as the name but it can be something as you like.
  • At last, on the DHCP server configure the PVS Load Balancing vServer VIP address under Scope Option window Option 066 Boot Server Host Name.

  • To verify this stop Citrix PVS TFTP service on one of PVS Server. Then Monitor_PVS on NetScaler as this detects if the service is down.
  • Try to boot up the Target Device it should contact the TSPVS002 in this case.


Microsoft Roaming Profile vs Citrix Profile Management


      Today I’m going to tell you about Citrix Profile Management and Microsoft roaming Profiles. Well, we see a lot of customers as well consultants struggle with User profiles, however, I have got some tips to share with you today! So I will do so with the Citrix profile Management and the MS Roaming Profiles.

The problem with Microsoft Roaming Profiles today
  • They grow uncontrollably. For example, when we add more applications and those settings are saved into the roaming profile. When we delete it from our system, it will still be in the Roaming Profile. This tends to be a big issue for the terminal servers as login time will increase after a while because profiles are growing and growing quite fast however they are never cleaned up! Or cleared! If a user has an issue we just delete the user profile and the user has to setup all the applications all over again.
  • Profile Corruption – This is a common problem, almost happening more than once a day for my experience. If we delete 5 profiles for a day, the users who want to login will have to set up the icons and applications just the way they like it all over again, which is tedious and frustrating both for the user and those at the Service desk.
  • Difficult to fix
  • Slow – This is caused when because. When you login the whole profile will be copied into the Terminal server which is where u login and when you log off the profile will be copied back to the file share. Regardless of If your profile is 5MB, 1GB or 3GB or more…. It will slow down your login time.
  • Susceptible to “last write wins” and resultant settings loss where application silos exist
Microsoft roaming profiles are not bad as well.
  • No Special modifications.
  • Easy to implement.
  • The user profile is accessible from any XenApp server.
  • Settings are saved across sessions.
What are alternatives??

There are many alternatives rather than using the MS roaming profiles such as MS UV-E, Appsense and Citrix UPM and more... But in this article I’m going to talk about UPM and its advantages and disadvantages.

I have seen the lots of customers who are using Citrix but not using UPM because they stick with MS roaming which is easy to implement and etc….

Why Citrix UPM??

Citrix UPM is agent installed on each Xen app or Xen Desktop Servers and gets setting from GPO and it’s adm or admx where we import to Active Directory we setup setting in AD and apply GPO and the agent reads from there!
  •  Included in XenApp enterprise and above
  •  It comes with Xin Desktop advanced and above as well.
  •  Eligible on both XD and XenApp as well as on your local computer.
  • Last write wins – for example When a user logs into two different Xen App or Xen Desktop servers using the same user account and the user loads the same roaming user profiles, the user will run Visa on Server 01 and user will edit a word document on Server 02 and log off However the user can continue his work in Visma on Server 02 after an hour of being logged off. Citrix UPM is built to solve last write wins. So in this case UPM overwrites the changes the user has done in his word document but in MS roaming it will copy the whole profile instead of overwriting it.
Features on Citrix UPM
  • Offline profiles.
  • Citrix steamed User Profiles – This loads the settings that you need during the login and after you logged on it will stream the rest of the files in background. This will increase the login time.
  •  Support for Folder redirection.
  • Active write back.
Customer and My Experience of installing Citrix UPM
  • It will take 30 mins to configure it and start using it.
  • 70MB User Profile and near 500+ files = 4 minutes login time.
  • After converting existing MS roaming profile to Citrix UPM.
  • It took only 10 -14 seconds to login.
I will show how to implement and migrate from Microsoft Roaming to Citrix Profile Management in my Next Post!

Hope you have learn something from this! See You Soon! 

Black Screen during Login to the “Publish Desktop”

Error

When connecting to a published desktop using Citrix web console or a receiver is unsuccessful, a black screen is displayed.


Solution

Create the following registry key Via GPO or on the vDisk.
[HKEY_LOCAL_MACHINE\SOFTWARE\Wow6432Node\Citrix\Logon] 
"DisableStatus"=DWORD: 00000001

Via GPO


Note: Use the Registry Editor at your own risk. Make sure to Backup the registry before you edit it.

Cause

Several reasons would have caused this issue.
Much of them are related to folder redirections or driver mapping, user profiles and GPOs, which point to an incorrect location or delays mapping during the login process due to the network bandwidth.

Hope this will help!!